# Default setup (bundled CLI)
> The Node.js and .NET SDKs include the Copilot CLI as a dependency—your app ships with everything it needs, with no extra installation or configuration required.
- 网址:https://funcoding.ai/agents/github-copilot/how-tos/copilot-sdk/setup/bundled-cli/
- 来源:GitHub Copilot 官方文档原文(英文),CC-BY-4.0 许可,同步于 2026-10-11
- 官方原文:https://docs.github.com/en/copilot/how-tos/copilot-sdk/setup/bundled-cli
---
The Python SDK recommends a one-time download step after installation:
```bash
python -m copilot download-runtime
```
This downloads the matching runtime and caches it locally. If you skip this step, the SDK will attempt to download it automatically on first use as a fallback.
**Best for:** Most applications—desktop apps, standalone tools, CLI utilities, prototypes, and more.
## How it works
When you install the SDK, the Copilot runtime is included automatically (Node.js, .NET) or downloaded via `python -m copilot download-runtime` (Python). The SDK starts it as a child process and communicates over stdio. There's nothing extra to configure.
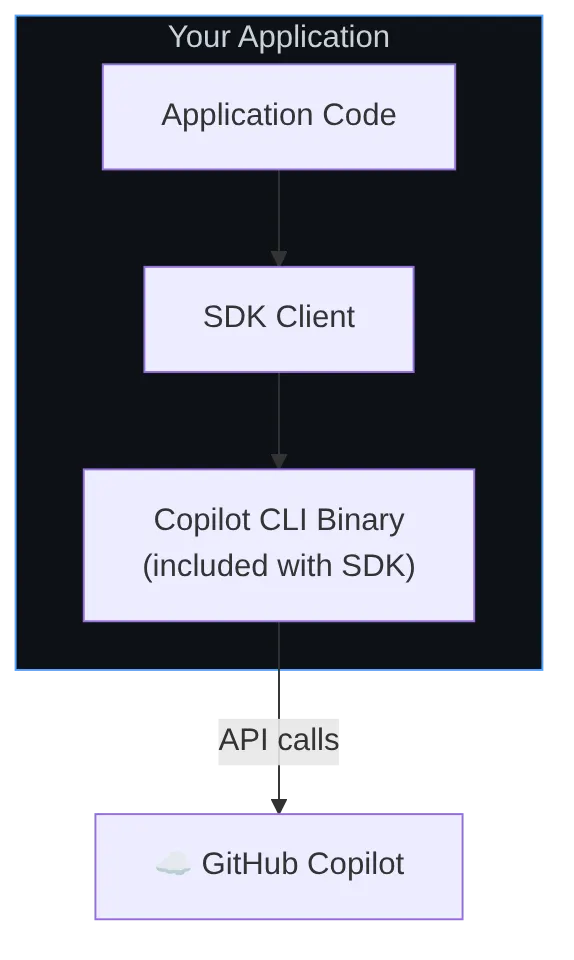
**Key characteristics:**
* CLI binary is included with the SDK—no separate install needed
* The SDK manages the CLI version to ensure compatibility
* Users authenticate through your app (or use env vars / BYOK)
* Sessions are managed per-user on their machine
## Quick start
Each SDK has a minimum language runtime requirement—see the Prerequisites section of the [Node.js](https://github.com/github/copilot-sdk/tree/main/nodejs/README.md#prerequisites), [Python](https://github.com/github/copilot-sdk/tree/main/python/README.md#prerequisites), [Go](https://github.com/github/copilot-sdk/tree/main/go/README.md#prerequisites), [Rust](https://github.com/github/copilot-sdk/tree/main/rust/README.md#prerequisites), [Java](https://github.com/github/copilot-sdk/tree/main/java/README.md#prerequisites), or [.NET](https://github.com/github/copilot-sdk/tree/main/dotnet/README.md#prerequisites) README—since an unsupported runtime (e.g. Python below the stated floor) can cause `pip`/package managers to silently resolve an outdated SDK release instead of reporting a version conflict.
**typescript**
```typescript
import { CopilotClient } from "@github/copilot-sdk";
const client = new CopilotClient();
const session = await client.createSession({ model: "gpt-5.4" });
const response = await session.sendAndWait({ prompt: "Hello!" });
console.log(response?.data.content);
await client.stop();
```
**python**
```python
from copilot import CopilotClient
from copilot.session import PermissionHandler
client = CopilotClient()
await client.start()
session = await client.create_session(on_permission_request=PermissionHandler.approve_all, model="gpt-5.4")
response = await session.send_and_wait("Hello!")
print(response.data.content)
await client.stop()
```
**go**
Unlike Node.js, Python, and .NET, the Go SDK does not include a CLI as an automatic dependency. With no explicit path, `NewClient(nil)` uses an embedded CLI when available, then falls back to `copilot` on `PATH`. To embed a CLI, run the [bundler tool](https://github.com/github/copilot-sdk/tree/main/go/README.md#distributing-your-application-with-an-embedded-github-copilot-cli) at build time. You can also set `COPILOT_CLI_PATH` or point a `Connection` at an existing binary. See [AUTOTITLE](https://funcoding.ai/agents/github-copilot/how-tos/copilot-sdk/setup/local-cli/) for details.
```golang
client := copilot.NewClient(nil)
if err := client.Start(ctx); err != nil {
log.Fatal(err)
}
defer client.Stop()
session, _ := client.CreateSession(ctx, &copilot.SessionConfig{Model: "gpt-5.4"})
response, _ := session.SendAndWait(ctx, copilot.MessageOptions{Prompt: "Hello!"})
if d, ok := response.Data.(*copilot.AssistantMessageData); ok {
fmt.Println(d.Content)
}
```
**dotnet**
```csharp
await using var client = new CopilotClient();
await using var session = await client.CreateSessionAsync(
new SessionConfig { Model = "gpt-5.4" });
var response = await session.SendAndWaitAsync(
new MessageOptions { Prompt = "Hello!" });
Console.WriteLine(response?.Data.Content);
```
**java**
The Java SDK does not bundle or embed the Copilot CLI. Install the CLI separately and either make `copilot` available on your `PATH` or set its location with `setCliPath(...)` (or connect to a running CLI server with `setCliUrl(...)`).
```java
import com.github.copilot.CopilotClient;
import com.github.copilot.rpc.*;
var client = new CopilotClient(new CopilotClientOptions()
// Point to the CLI binary installed on the system
.setCliPath("/path/to/vendor/copilot")
);
client.start().get();
var session = client.createSession(new SessionConfig()
.setModel("gpt-5.4")
.setOnPermissionRequest(PermissionHandler.APPROVE_ALL)
).get();
var response = session.sendAndWait(new MessageOptions()
.setPrompt("Hello!")).get();
System.out.println(response.getData().content());
client.stop().get();
```
## Authentication strategies
You need to decide how your users will authenticate. Here are the common patterns:
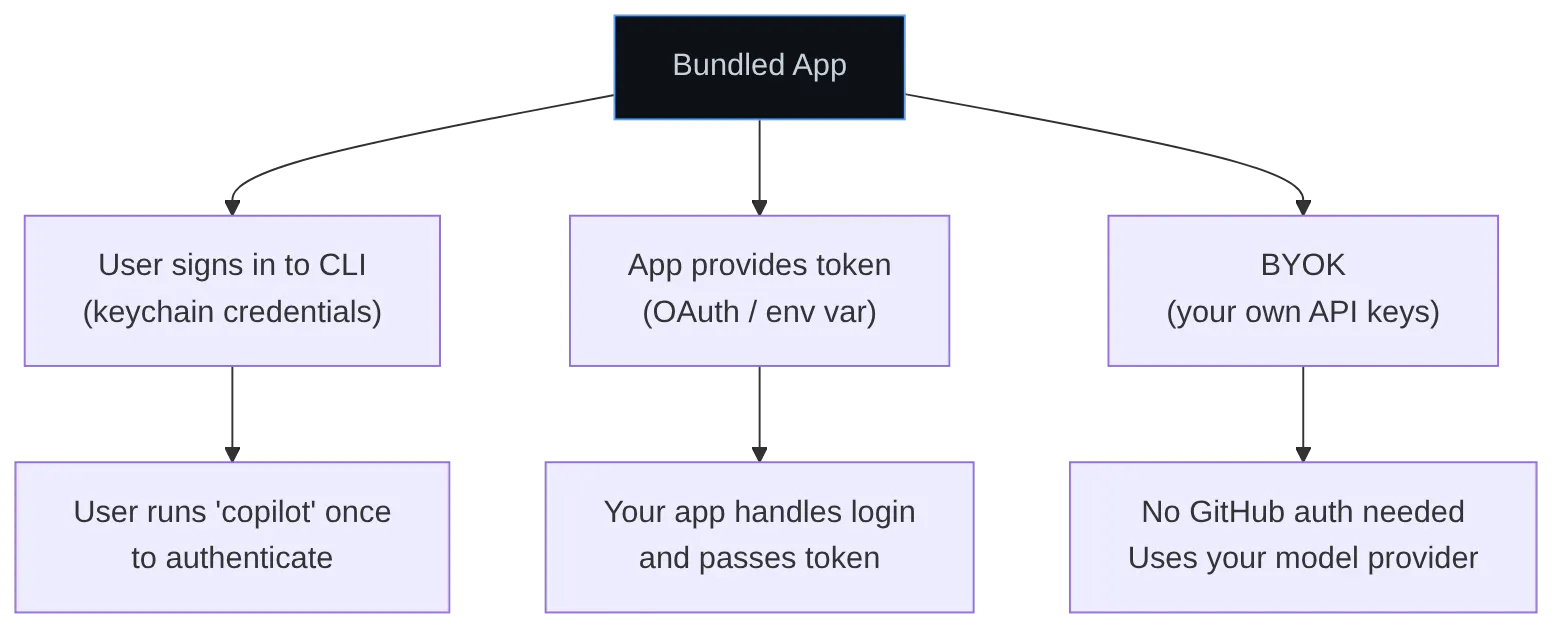
### Option A: user's signed-in credentials (simplest)
The user signs in to the CLI once, and your app uses those credentials. No extra code needed—this is the default behavior.
```typescript
const client = new CopilotClient();
// Default: uses signed-in user credentials
```
### Option B: token via environment variable
Ship your app with instructions to set a token, or set it programmatically:
```typescript
const client = new CopilotClient({
env: {
COPILOT_GITHUB_TOKEN: getUserToken(), // Your app provides the token
},
});
```
### Option C: BYOK (no GitHub auth needed)
If you manage your own model provider keys, users don't need GitHub accounts at all:
```typescript
const client = new CopilotClient();
const session = await client.createSession({
model: "gpt-5.4",
provider: {
type: "openai",
baseUrl: "https://api.openai.com/v1",
apiKey: process.env.OPENAI_API_KEY,
},
});
```
See the **[AUTOTITLE](https://funcoding.ai/agents/github-copilot/how-tos/copilot-sdk/auth/byok/)** for full details.
## Session management
Apps typically want named sessions so users can resume conversations:
```typescript
const client = new CopilotClient();
// Create a session tied to the user's project
const sessionId = `project-${projectName}`;
const session = await client.createSession({
sessionId,
model: "gpt-5.4",
});
// User closes app...
// Later, resume where they left off
const resumed = await client.resumeSession(sessionId);
```
Session state persists at `~/.copilot/session-state/{sessionId}/`.
## When to move on
| Need | Next Guide |
|------|-----------|
| Users signing in with GitHub accounts | [AUTOTITLE](https://funcoding.ai/agents/github-copilot/how-tos/copilot-sdk/setup/github-oauth/) |
| Run on a server instead of user machines | [AUTOTITLE](https://funcoding.ai/agents/github-copilot/how-tos/copilot-sdk/setup/backend-services/) |
| Use your own model keys | [AUTOTITLE](https://funcoding.ai/agents/github-copilot/how-tos/copilot-sdk/auth/byok/) |
## Next steps
* **[AUTOTITLE](https://funcoding.ai/agents/github-copilot/how-tos/copilot-sdk/auth/byok/)**: Use your own model provider keys
* **[AUTOTITLE](https://funcoding.ai/agents/github-copilot/how-tos/copilot-sdk/features/session-persistence/)**: Advanced session management
* **[AUTOTITLE](https://funcoding.ai/agents/github-copilot/get-started/sdk-quickstart/)**: Build a complete app